Showing posts with label craft. Show all posts

Tuesday, October 16, 2012

290/366: I'm Your Mummy


This is such a cool craft for Halloween. I found it on...you guessed it, Pinterest.

Each year, the Cub Scouts have a Halloween party where each Den provides an activity. I often felt a craft was needed in this mix. So, I volunteered. Last year I did the gross touch and feel. That was already more work than this.

I sampled five different types and gauges of wire. Since the Pinterest link calls for rubber coated wire for landscaping which runs upwards of $7.00 per coil (yielding two or three mummies), I needed to find something much more economical for the close to 80 cub scouts plus their siblings.

Aluminum wire in 14 gauge proved to be the winner. After I formed my mummy shape, I wrapped the wire in three thin strips of muslin. Surprisingly, the fabric stayed on the mummy quite well. A Dan of glue for the end of the final strip wouldn't hurt.

Tomorrow, the boys are going to try to make one as a test.

Super easy and fun.

Sunday, September 30, 2012

274/366: Pintember in the Toilet


This is the final installment of Pintember.  I hope you enjoyed it.  I found it to be quite a challenge.  I thought when I semi-retired, I'd have more time to do things like this. 

That doesn't seem to be the case.  And that's okay.

There are still a couple Pinterest projects I'd like to complete, and will show you those as I do them.  The Pintember Project was good.  It kept me creative and writing, and not just falling asleep sitting up while watching TV.

So, my toilet project.

Toilet paper rolls, more specifically.


This is a fairly easy project.  I cut about 20 toilet paper rolls into 5 strips.  Then, with my glue gun, I just went to town.  There is no real way to do this, other than just sticking the new pieces where there is a hole.  I turned the flower as I went and eyeballed all of it.

I also didn't measure the width of the cut pieces.  You may be able to see in the photo that the pieces aren't perfect, aren't the same height and are placed randomly.


 I found the painting to be the most challenging.  My spray paint from my animal taxidermy project didn't seem to coat very well.  I used almost an entire can and thought I'd have plenty.  The paint seemed to absorb into the paper.

But, standing back, you really can't tell. 

I think this was a fun project and a good way to end the month...in the toilet!  Ha!

I'm still working the POSTADAY for the remainder of the year, so don't be a stranger.

Thanks for reading Pintember!

Friday, September 28, 2012

272/366: Pintember Booking

It seems that every night when I attempt to tuck my boys in for the night, I am asked for a bookmark.

I love that books are piled at their bedside.  I love that they are reading.

I don't, however, care so much for the "I need a bookmark".

So...here is my solution:

This is super easy!  And you are recycling!

We pay our bills on line, but still request paper invoices.  Every paper invoice comes with a return envelope.  This is a great way to use the envelopes with pre-printed addresses.

Just cut off the corner with scissors or a straight-line cutter.

Then...embellish!


The purple one is just colored with a purple marker.  I added a fun little hat.  The white one has ears (the corners of the envelope).

This is definitely a great craft to do with kids of all ages.

I have a feeling the boys are going to request some envelope corners soon!

Here is the inspiration post...also a really cute idea:


Wednesday, September 26, 2012

270/366: Pintember Rocks Again

This is one of those projects where it looks so much easier than it really is.

Kind of bummed about that.

I used my favorite Sharpie Oil Based Paint Markers again for this project.
Here is the inspiration pin:

Source: bing.com via Carrie on Pinterest


Amazing. 

I didn't need to paint my rocks first, this obvioulsy was a big mistake.  Especially on the black one.  The white just doesn't cover the black enough.

Ick!

I will keep my head up because I tried, and down so I can pick up more rocks!

Sunday, September 2, 2012

246/366: Pintember - Rock Painting


I LOVED this project.

It brought out all the loves of childhood:  painting, creativity and collecting.

The original post is here:
.

Although I did a couple with hearts, the idea of turning a rock into something else, was much more interesting.  We found the best rocks at the beach.  The smoothness was much better for the markers, too.  Once we got to the mountains and did this craft again, the marker tips began to fray and make me sad.

I ended up getting Sharpie Brand Oil Based Paint Markers.  The more coats, the shinier the rock is.  They don't even require any special coating.

My niece was in love with this craft, always asking "Aunt Carrie, can I paint rocks?"
Must have a turtle!

This project is another thumbs up.  Definitely bringing the paint markers every time we go camping.  It really kept the kids occupied and happy.


Monday, February 20, 2012

51/366: Last Year this Day


Happy President's Day!

Because I am working and the boys are home, I'm going to pretend I had time to make these cute little guys today.

Pretend with me?

Here is the link to the original post and links to the directions.  They are super cute.

Wednesday, February 15, 2012

46/366: Children's Artwork into Plushies

If you are like this mom, you get plenty of drawings of monsters and dragons and turtles and Star Wars battles.

Monday night, yes, the eve of Valentine's day, I was hopping from toy store to toy store in search of plush turtles.  My boys have a fondness for those turtles, even though their father recently shared the 'turtles have bacteria' information.  Now, you say "turtle" and they say "bacteria".  Kind of like a football cheer.

When I realized the turtle plushie market had been tapped in this area, my mind began doing what my mind does often.  It starts to roll and build and imagine.  It's like a snowball going down a mountain, with me inside.  Sometimes, I just can't help myself.  And besides, I'm the world's second best procrastinator behind my Dad.  Thoughts of turtles, small, pillow like, maybe puppet?  No, too hard.  Crochet?  Could I make enough crochet hexagons?  No.  Felt?  Do I have enough?  I do have the leftovers from Christmas plus that fleece.  Stop.  Shop at lunch tomorrow.  Decided.  I will buy them something.

I was cleaning up my studio (aka basement) and found some half done monster purses.  One was a purse that was just too big and clumsy.  I had reworked the handles twice and it still hadn't sold.  I had been thinking that it would be a cute pillow.  So, I rolled some batting I had to see what it would look like. 

Big Boy wanted it.  That is when the light bulb turned on.  That is the gift!  I'll make him a monster pillow.  I talked him into making his own drawing and we would work on them tomorrow when they got home from school.  BB spent a long time working on his picture.  Labeling all the colors, many, many colors.  Little Man got in on the fun and was drawing Darth Vader and light sabers (ugh) and I complemented him on it, because that is what Mom's do.  Creativity shall never be negative.

Once Little Man saw what BB had done, he needed to start over (yeah!).

It feels so good to make something that my boys' came up with.

And, do you think they liked them?  See for yourself.

Thursday, February 2, 2012

33/366: School Treat Tutorial

In celebration of Groundhog Day (which is dear to my husband's heart), Little Man and I decided to make the little groundhogs on the graham cracker again.  This is the link to last year's attempt.  This year was much easier and a lot less work.

Supplies:
Box of graham crackers
Brownie Bites (one for each hog)
One tub chocolate frosting
Slivered almonds (last year I used coconut...either work)
Small batch of white icing (powdered sugar, milk, a touch of Karo syrup)
Chocolate rocks (we have no snow in these parts, so we added rocks)

First step is to open up all of your brownie bits and lay them out on waxed paper or parchment.
These would have been fine as is, but I shaped them a bit to make them taller and not as wide.  By the last one, I realized the easiest way was to form a divot in the bottom and push the sides around you fingers.

Next, heat up your frosting so it is soupy.  I put a fork in the bottom of the bites and dipped them just to the sides, leaving the bottom without frosting.

Here is the trick...to get the bite on the paper without messing up the frosting, place the tines of a second fork through the fork holding the bite, pulling out the first fork.  You are left with the bite balancing on the convex side of the fork, then slide off on to the paper.

Before the frosting hardens, stick on two slivered almonds for the teeth.  I could do 3 brownies before the frosting started hardening.

Let those sit and prepare your white icing.  You could easily use more cake frosting instead, just warm a batch of it for the snow, set some aside for the eyes.

Lay out your graham crackers (break in half) and start assembly.   Be somewhat quick getting your hogs on the snow, that stuff hardens pretty quickly and it won't give you the stick you need.  Add your stones (if using) at this point.  Preferably by a cute little boy.

Next, I took the remaining chocolate frosting and added some blue and red food coloring to it to make it darker, almost black for the nose.  I put it in a baggie and stuck it in the fridge for a bit, since it was still pretty soupy from the dipping.  Snip off the corner of the baggie and add a nose at the top of the teeth (almonds).  Let that dry a touch and add your eyes.  Again, with a baggie and cold frosting, I added little eyes.  I was having trouble with them leaving a tail of frosting, so I worked them from the nose upward and touched the hog with the bag to stop the flow of icing.  When that icing settles, they look pretty good.

Finally, and this is where I get a little crazy...I added poppy seeds for pupils.  I know, crazy, but it really did finish it off nicely.  Wet fingers on a paper towel and pick up a seed with a finger and press into eyes.

Wa-la!

You could do these for Easter and make into rabbits, snowmen, so many ideas.  Super easy and adorable.  Great project for the kids.

Happy Groundhog Day!

Tuesday, January 10, 2012

10/366: Hearty Giveaway

Remember this? 

You can find the tutorial right here.  But, if you like this and don't want to get all Martha...I have one to give away.  Just leave a comment here (or on the Facebook post) and tell me your favorite Valentines Day gift to give, or that you have received or wish to receive.

I'll pick a name at random via my Random Number Generator Picker Name Out of Bag Boy.  I'll close comments on Saturday evening.  And ship this out to the lucky winner.

Friday, January 6, 2012

6/366: Initial Mug Tutorial

I made a couple mugs for our neighbors and Grandma's this Christmas.  They are so cute.  I was inspired by this post.

The porcelain Pebeo paint in the tube is really easy to use and I barely made a dent in the tube.  I chose the outliner paint for it's long tip.  I didn't have the option of choosing a pen as the shop I was at was in the rearranging process and they were no where to be found.

This is simple, you print out your picture or letters from the computer, cover the back of the paper in pencil (yes, just like you did as a kid) and tape it on to the mug.

Taking a pencil, trace the letters onto the mug.  After removing your paper, you will see the faint graphite from the pencil.  Begin tracing your letters with the outliner paint.  For the inside, I squeezed a little paint, then pushed it around with the tip to give it a scratched look.

I made one for myself, too.  They are so quick and easy.  The original poster found their mugs at the thrift store, but I went to a big box store and found these for $2 a piece.  I love the big size.  This would also be cute with a colored mug.

We will definitely do this again, this time, the kids will draw a picture and I'll assist them in tracing the lines on the mug.  The best part, if they mess up or don't like it, you just wipe off the paint and start over.

Once you have your final product, you allow the mug to sit for 24 hours, then put it in a cold over, set for 325 degrees.  Once the oven is warmed to 325, continue to bake for 35 minutes.  Then done!

Dishwasher and food safe (not sure about the microwave).

This was one of my favorite holiday crafts, so simple and quick!

Sunday, November 20, 2011

Sunday Morning

 I am smitten with this project.

It is so easy, so cheap and I think it looks funky.

The photo from Pinterest and my post last night, showed the original just painted white.  I have enough plain walls in my home, that I wanted a little more color.  I picked up a dark blue that looks like denim.  I thought I would paint it heavy, but as the sponge brush was sliding the paint down the grain of the canvas, I had to stop.  The glue took the paint 100%, and the white canvas soaked in some of the paint.  My brush took much of the paint off as well.  I used about 1/3 of a small bottle of acrylic paint.

This is another view with light catching it in a different way.

Now...the possibilities.

Kid's art?  Christmas Tree?  Spring flowers? 

Saturday, November 19, 2011

Saturday Night


I've seen this come up on Pinterest a couple times.

And I've thought...so easy, I need to try.

And so I did.

Elmer's Glue on a canvas.  That is it...until it dries.

Saturday, June 25, 2011

Bow Ties and Little Graduates

When my boys ask me to make them something, I usually do it. Eventually, anyway. Sometimes their requests are a little beyond my time constraints.

But when the request is for a bowtie...heck yeah.

I made this one Wednesday night, scratch that, Thursday morning at 1:30 am. A mere 9 hours prior to this little guys Pre-K graduation. I practiced tying it via YouTube and a roll of paper towels. Quite a sight at 2 am on a Thursday morning.


He loved it. Wore it all day. He really looked cool, and asked for more. Oh yes, little O, you will have one for every outfit if you so desire. I found the pattern here.

The reason I didn't start the bowtie before midnight...I was decorating these Nut Free, Egg Free, Gluten Free, Artificial Dye Free cookies. They were quite delicious!

Friday, January 21, 2011

Back on the Horse


I picked up the knitting needles again.  
Admittedly, I needed a couple YouTube tutorials to refresh my memory.

I do however, remember why I prefer crochet. I get so nervous that I'll mess up or the needles will fall out and I'll have no idea how to fix it.  I already have two mistakes on this 3 inch thing.  

Scored another great yarn.  This one is Organic Cotton...so soft.

As much as I'm enjoying this...I have so many things partially done.  

This pic above.

The little dream in silk bamboo.

A gift for a baby born last year.

PJ pants for my boys, fabric washed and ready since October.

Owl Purse, just needs the zipper.

Another purse base, just waiting for a strap and a ______.

Large work in progress that I started on my last plane trip.

Another white hat on knitting needles (may rip that one out, too tight and tiny).

Eight.
Eight items in progress.

and yet I still spend my time on the computer.


Wednesday, September 1, 2010

Tutorial: I Am Momma Hear Me Roar!

I usually don't post tutorial's from other blogs, but this one I just had to.

And, by posting this, I'm committing you to 12 readers (hee hee!) that I will be making these hats for my boys. And perhaps, if I have enough fun...I may just make some as Christmas gifts.

Please, check these cool upcycled hats out.

This blog is my new favorite with posts everyday! Who doesn't love that?

Saturday, March 27, 2010

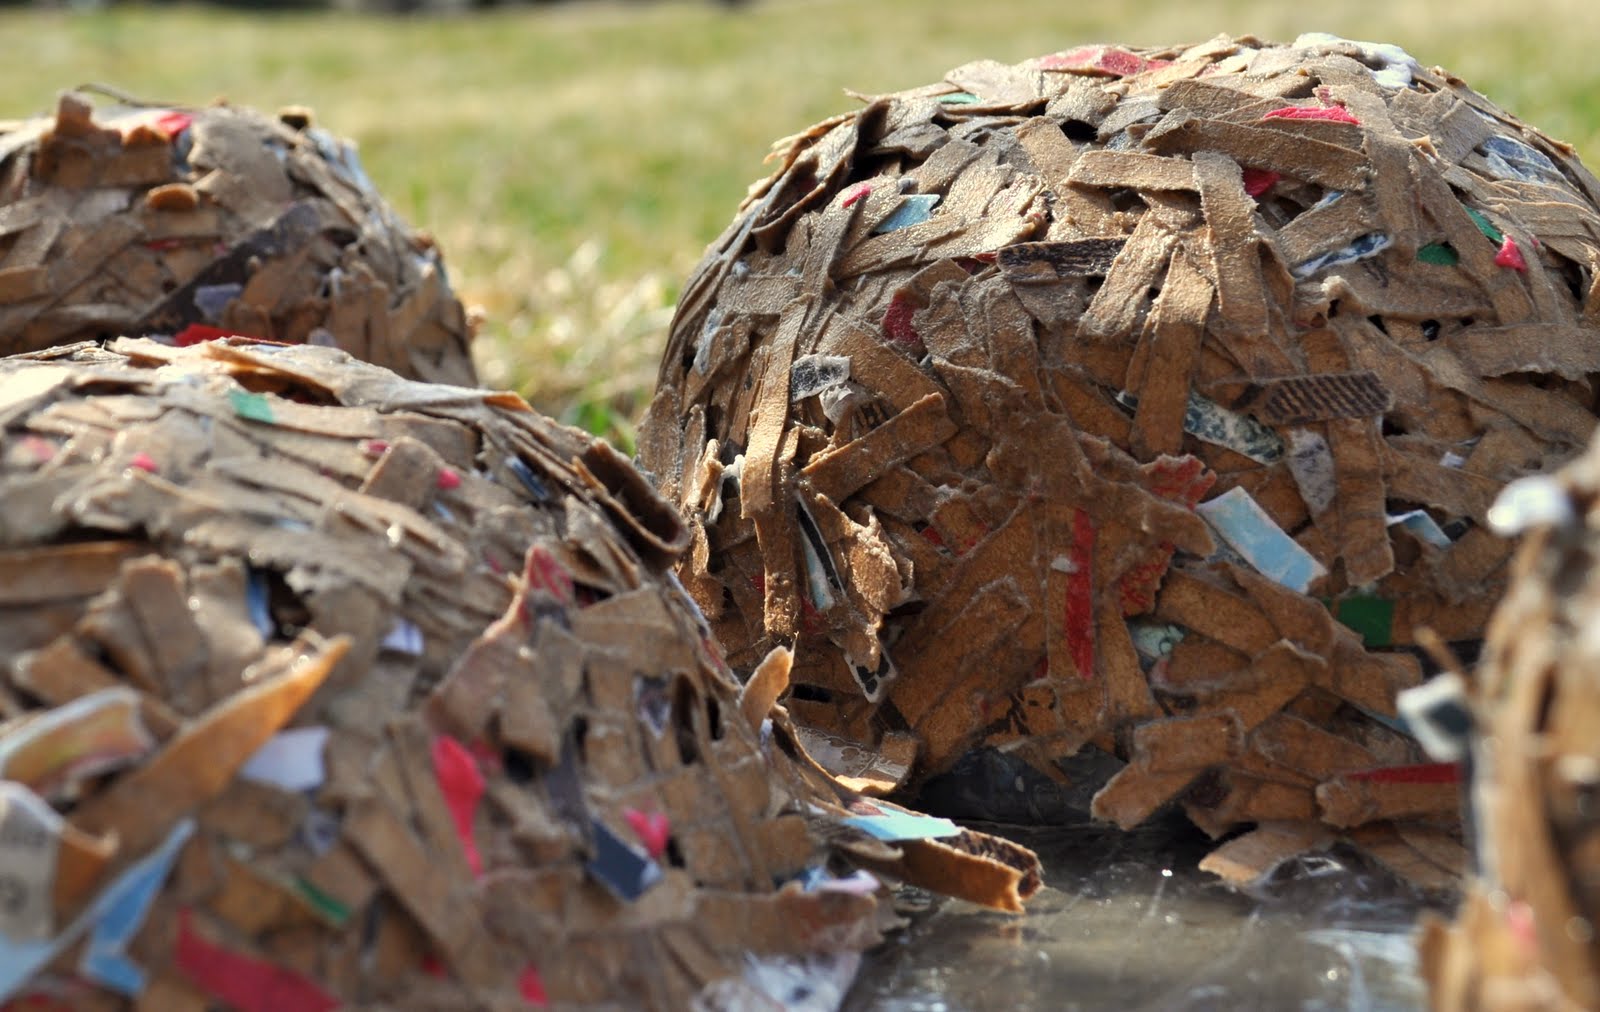
Tweet Tweet Nest

1. Shred a couple paper grocery bags and other colorful pages from magazines (just for some dimension)
2. Add one part white glue, one part water and mix together.

3. Add shredded paper to glue water mixture and get the paper wet with glue.
4. Pack glued paper to bowl covered in plastic wrap.

5. Set out to dry for a couple days.

6. Photograph your creation.

7. ...both creations.

Full craft instructions found here at Alpha Mom Blog

Saturday, February 13, 2010

Friday Night Goodnight Show

This blog seems to be bordering on a parenting blog more so than a craft and art blog. So be it.
It also appears that I only have one child when that couldn't be more wrong. It just so happens that the older boy is less interested in my photo taking and home less than this little man.

Last Friday night, while Sam was at soccer practice, O and I were watching Sprout. They had a tambourine craft that O thought was the cat's pajamas. Although he didn't say 'cat's pajamas', it was more, "that's totally awesome, I wish I had one". That was enough for this mom that shot up from that comfy couch to make a craft.

A pantry without beans, still held these rice macaroni that I bought before I found Tinkyada pasta. This stuff needs to soak and cook for what seems to be a full day. They are cheap, though. But not cheap enough to taste acceptable. So...two plates, something to make noise and a stapler. I was informed by a wide eyed boy that I was supposed to use glue to seal the tambourine. Ah...he was paying attention. After he realized he couldn't play with it until the next day, the staples were just fine.


His own decorating makes my heart go putter patter.

Unfortunately (or fortunately) this tambourine and the one the big guy made after he came home from soccer practice, haven't been touched since that night.

And for anyone with a good eye...the cloth that O is resting his tambourine on in the last picture was the very first loom woven item I made. It is a sampler shawl made on a table loom in college. Oh...I remember the beginning of my obsession with weaving with fond memories.

Now, if I would just get off this computer and dress the loom that hasn't been touched in over a year!

Wednesday, August 27, 2008

Great Blog Reads

My two favorite blogs to read lately are Juicy Bits and Yummy Goods.

These girls make me happy.

These girls remind me to be proud to have the desire and talent to create with my hands.

These girls remind me that it is important to have an outlet in which I can rediscover myself and keep my crafting side in line with my family. Ultimately, the boys will always come first, but sometimes, the craft may need to come a very close second.

These girls remind me to not lose myself in the lives of my kids and their activities.

These girls remind me how it is important to set and follow through on personal creative goals.

These girls are like me.

(I hope they don't think I am stalking them!)